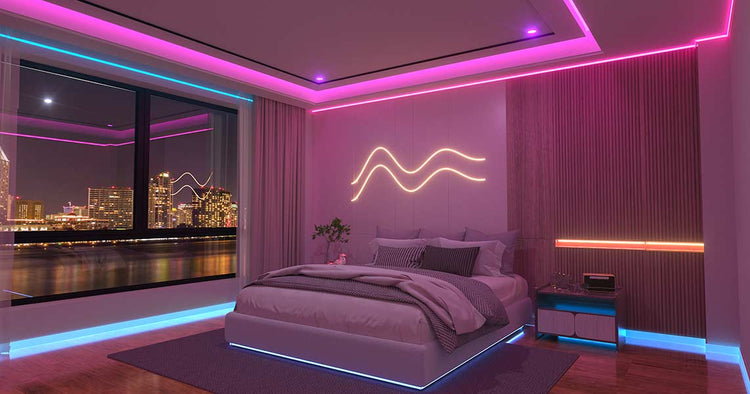
LED Strip Lights: Brighten up Your Ceiling

1. Understand the properties of the light strip
✧Brightness: Choose the right brightness according to your needs. For example, if you want a soft background light, choose a lower-lumen strip; if you want brighter lighting, choose a higher-lumenled light strip.
✧Color and control: SomeLED strip lights can change color and be controlled via a remote or smartphone app.
✧Length: Make sure the light strip you buy is long enough to cover the entire ceiling surround.
✧Voltage: Common LED strips are available in 12V and 24V. Choosing the right voltage is important to ensure the stability and longevity of the strip.
✧Wattage: Choose the right power adapter based on the power of the strip (usually expressed in watts per meter). For example, if you have a 5-meter strip with 15 watts per meter, you will need at least a 75-watt power adapter.
✧Color temperature: usually expressed in "K" (Kelvin), e.g. 2700K (warm white) or 6500K (cool white). Choosing the right color temperature can affect the ambiance of a room.
✧CRI (Color Reproduction Index): The CRI indicates how realistically a light displays color. A high CRI (above 90) means that colors are displayed more realistically.
✧LED Density: LED density is the number of LEDs per meter of strip. Higher-density strips provide more even light.
✧IP Rating: If you plan to use the strip in wet environments (e.g. bathrooms), choose a strip with an appropriate waterproof rating, such as IP65 or IP67.
✧Controllers and connectors: Choose the right controller for the type and function of the strip. For example, an RGB strip requires a controller that can control the color.
If you need to connect multiple strips, make sure the connectors match the width and number of pins of the strip.

2. Measure and plan:
(1)Use a tape measure to measure the length around the ceiling to make sure the light strip is the right length.
(2)Decide where to place the light strip, e.g. whether to place it at the junction of the ceiling and the wall, or slightly away from the wall.
3. Prepare tools and materials:
Scissors or utility knifeConnectors (if more than one light strip needs to be connected)
Power adapter
Cleaning cloth and alcohol (for cleaning the mounting surface)
4. Installation:
1.Use a cleaning cloth and alcohol to clean the surface around the ceiling to ensure that the light strip can be firmly adhered to.2.Starting at one end of the light strip, gradually peel off the tape on the back and carefully adhere the light strip to the intended location.
3.Use connectors to attach multiple light strips if needed.
4.Connect the power adapter and make sure all connections are secure.

5. Testing:
Turn on the power and test the light strip for proper operation.
If there is a remote control or app, make sure they can control the light strip properly.
6. Caution express:
✧Do not bend the LEDs and circuitry parts of the light strip; this may cause damage.
✧Make sure the voltage of the power adapter matches the strip.
✧If the strip does not light up or part of it does not light up, check that the connections are secure.
✧LED strips generate heat when they are in operation. Ensure that they are installed in a good heat-dissipation environment to avoid overheating.
